
10 Best High Tunnel Greenhouse Kits for Sale
Choosing among high tunnel greenhouse kits can feel difficult when product photos hide important details. A sturdy frame, reliable cover, and practical ventilation system matter more than a polished advertisement. This guide examines ten greenhouse kits for sale with attention to frame strength, anchoring, cover quality, door design, ventilation, and assembly requirements. It also considers growing space, seasonal use, and the conditions each kit may suit best.
Real-world performance depends on more than the kit itself. Wind exposure, snow loads, soil type, sunlight, and local climate can change the buying decision. A tunnel that works well on a sheltered vegetable farm may struggle in an exposed backyard. Check manufacturer specifications carefully. Review warranty terms. Confirm replacement-cover availability before ordering. These small checks can prevent expensive frustration later.
No kit is perfect. Some models offer generous growing space but require more labor during installation. Others cost less yet provide fewer vents or lighter anchoring hardware. That trade-off deserves honest attention. The selections in this article are compared using practical, evidence-based criteria rather than appearance alone. Product documentation, user feedback, construction details, and basic horticultural needs all inform the discussion. Still, readers should measure their site and verify local weather demands before purchasing. A thoughtful choice can protect seedlings, extend the growing season, and make daily crop care noticeably easier.
What a High Tunnel Greenhouse Kit Is and How It Works
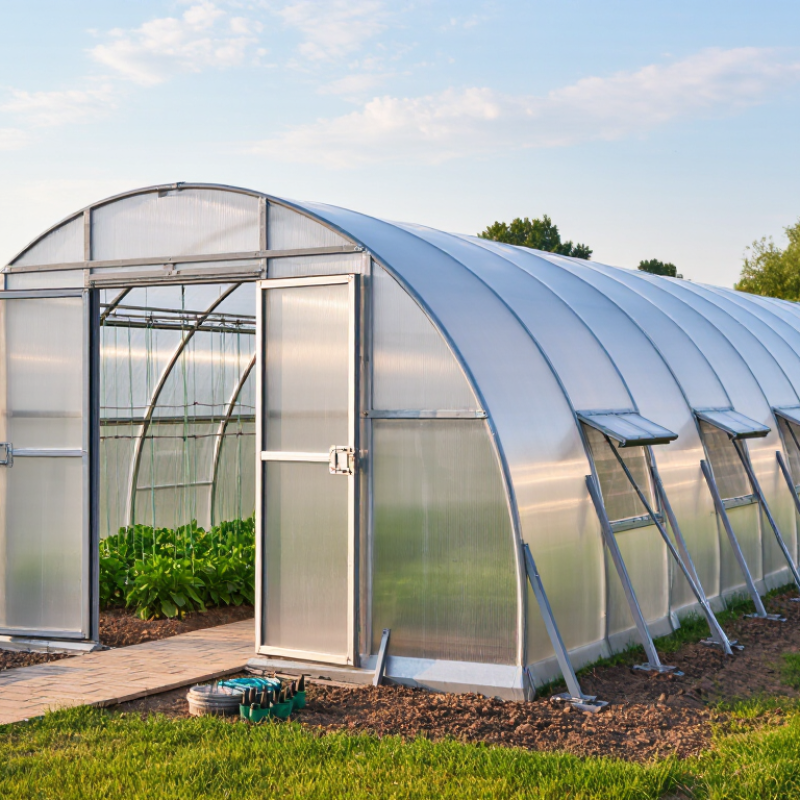
A high tunnel greenhouse kit is a simple growing structure built from curved metal hoops, ground anchors, end walls, and a clear polyethylene cover. Unlike a heated greenhouse, it usually has no permanent heating system. Sunlight warms the soil and trapped air during the day. At night, the cover slows heat loss.
Most kits include roll-up sides, which control airflow and humidity. On a warm afternoon, opening both sides can create a noticeable cross-breeze between the vegetable rows. Closing them before sunset helps protect young plants from cold air. The cover also shields crops from heavy rain, wind, and some pests. However, it does not create a perfect climate.
Installation quality matters. Anchors should reach firm soil, and the frame must remain square before the cover is stretched. A loose cover can flap, tear, or lose heat. I would also place a thermometer at plant height, not near the roof, because temperatures can differ sharply inside the tunnel. Drip irrigation keeps leaves dry and reduces wasted water, while raised beds improve drainage. A high tunnel can extend the growing season, but it will not solve every problem. Poor ventilation may encourage disease, and extreme cold can still damage unprotected crops. Even experienced growers sometimes overestimate how much warmth a single plastic layer provides.
10 Best High Tunnel Greenhouse Kits for Sale - What a High Tunnel Greenhouse Kit Is and How It Works
| Rank | Recommended Kit Type | Width | Length | Peak Height | Frame and Cover | Ventilation and Access | Best For |
|---|---|---|---|---|---|---|---|
| 1 | Compact Starter Tunnel | 12 ft | 20 ft | 7–8 ft | Galvanized steel hoops with a 6 mil greenhouse polyethylene cover | One framed door and manual roll-up sides | Backyard growers, herbs, seedlings, and short-season vegetables |
| 2 | Extended Home Garden Tunnel | 12 ft | 24 ft | 7–8 ft | Galvanized steel frame with UV-treated 6 mil polyethylene film | Two roll-up sidewalls and a zippered or framed entrance | Families seeking additional growing space and earlier spring planting |
| 3 | Raised-Bed Production Tunnel | 14 ft | 24 ft | 8–9 ft | Heavy-duty galvanized hoops with reinforced polyethylene cover | Roll-up sides, end-wall vents, and one wide access door | Raised beds, salad greens, root crops, and market-garden trials |
| 4 | Four-Season Vegetable Tunnel | 14 ft | 36 ft | 8–9 ft | Braced galvanized steel frame with 6 mil greenhouse film | Full-length roll-up sides and two end doors for cross-ventilation | Extended harvests, winter greens, tomatoes, peppers, and cucumbers |
| 5 | Small Commercial Tunnel | 16 ft | 24 ft | 9–10 ft | Reinforced galvanized frame with UV-resistant polyethylene cover | Two roll-up sides, end vents, and wide double-door access | Small farms, community gardens, and direct-market production |
| 6 | Long-Row Growing Tunnel | 16 ft | 40 ft | 9–10 ft | Galvanized steel hoops with hip and base rails plus 6 mil film | Manual or motor-ready roll-up sides and two end doors | Long crop rows, trellised plants, and high-volume seasonal growing |
| 7 | Heavy-Duty Snow-Region Tunnel | 20 ft | 36 ft | 10–12 ft | Closely spaced galvanized hoops, diagonal bracing, and 6 mil film | Roll-up sides with reinforced end walls and wide doors | Cold climates, high wind exposure, and growers needing extra headroom |
| 8 | Large Market-Garden Tunnel | 20 ft | 48 ft | 10–12 ft | Reinforced galvanized frame with UV-stabilized polyethylene cover | Full roll-up sides, two end doors, and optional powered ventilation | Commercial vegetables, flowers, berries, and succession planting |
| 9 | Wide Access Production Tunnel | 24 ft | 48 ft | 12–14 ft | Heavy galvanized frame with cross-bracing and 6 mil greenhouse film | Large double doors, roll-up sidewalls, and end-wall ventilation | Equipment access, tall crops, multiple growing beds, and farm operations |
| 10 | Enterprise-Scale High Tunnel | 30 ft | 96 ft | 14–16 ft | Commercial-grade galvanized structure with reinforced polyethylene cover | Motor-ready roll-up sides, multiple doors, and optional exhaust fans | Professional farms, wholesale production, and large protected-cropping programs |
| How a high tunnel works: A high tunnel is a passive-solar protected growing structure. Its polyethylene cover admits sunlight and traps heat, while roll-up sides, doors, vents, and optional fans release excess heat and moisture. The structure normally has no permanent heating system, so the selected size, anchoring method, frame spacing, and local snow and wind requirements should be verified before purchase. | |||||||
Related Posts
-
What is Farmtek Greenhouse and How Can It Benefit Your Business?
-
Best Home Hydroponic Systems for Beginners 2026?
-
Top 10 Hydroponic Garden Systems for Thriving Indoor Gardening
-
What is LED Grow Lights and How Do They Work?
-
How to Choose Shade Cloth for Greenhouse Success?
-
China Top 10 High Tunnel Manufacturers for Global Buyers