How to Start Hydroponic Growing for Beginners?
Hydroponic growing can begin on a kitchen counter, not in a high-tech greenhouse. A small reservoir, net pots, clean water, and a leafy-green seedling are enough to learn the basics. Yet plants still need balanced nutrients, suitable light, and steady attention. The setup is simple; the details matter.
The wider water context helps explain the interest. The FAO report Water for Sustainable Food and Agriculture (2017) estimates that agriculture accounts for about 70% of global freshwater withdrawals. That figure describes agriculture overall, not hydroponics specifically. Recirculating systems can reduce water losses, but savings vary with design, leaks, climate, and operating habits. No system is automatically efficient.
Commercial use is also documented. The USDA’s 2022 Census of Agriculture records greenhouse production as part of U.S. agricultural activity, though it does not isolate every hydroponic method. For beginners, practical progress starts with a modest crop, such as lettuce or basil, and a simple way to check pH and nutrient strength. Keep notes on water changes, light hours, and leaf color. Small clues count. A yellow leaf can signal several different problems, so avoid changing everything at once. Expect a few mistakes; they are useful evidence, not a reason to abandon the project. This guide explains the equipment, setup, and routine behind dependable hydroponic growing—without pretending that one recipe suits every home.
Understanding the Basics of Hydroponic Growing
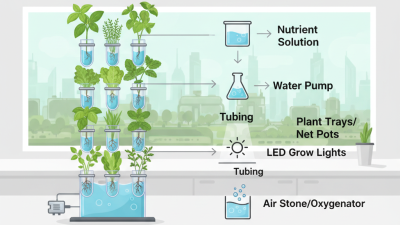
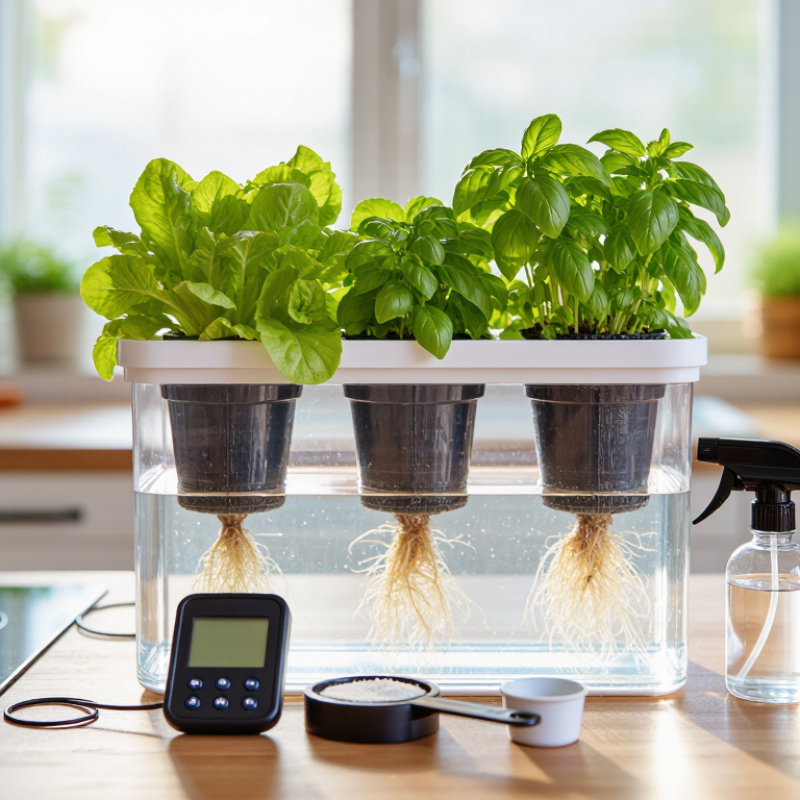
Hydroponics grows plants without soil, but it does not remove the need for careful growing conditions. Roots sit in, or receive, a nutrient-bearing water solution; a pump or air stone may keep that water moving and oxygenated. Think of a clear reservoir, damp roots, and steady light. The basic controls are water level, nutrient strength, pH, temperature, and cleanliness. For lettuce, many growers begin near pH 5.5–6.5, then adjust based on crop guidance and measurements. A handheld meter helps, though readings can drift and need checking. Small details matter. A clogged line or warm, stagnant water can stress roots before leaves show obvious signs.
Published results are promising, but they need context. In a 2015 Arizona comparison, Barbosa and colleagues reported about 41 kilograms of hydroponic lettuce per square metre annually, versus about 3.9 kilograms in the conventional field system studied. Their hydroponic setup used roughly 20 times less water per kilogram of lettuce. These figures describe one study, not a guarantee for every home system; climate, equipment, and operator skill change outcomes. Beginners can start with a few leafy greens and record pH, nutrient concentration, and water temperature each week. I still find this part easy to underestimate: a neat setup does not automatically mean a balanced one. Source: Barbosa et al., International Journal of Environmental Research and Public Health, 2015.
Hydroponic Growing: Typical pH Ranges for Beginners
Many common hydroponic crops grow well with a nutrient-solution pH between 5.5 and 6.5. These ranges are general starting points, not guarantees—crop variety and growing conditions can affect the ideal range. Test the reservoir regularly and adjust gradually.
Choosing a Suitable Hydroponic System and Growing Space
A suitable hydroponic system depends on the crops, available space, and time you can give it. For a small first setup, a deep-water culture container can grow leafy greens with few moving parts. Keep the roots suspended in nutrient solution and use an air pump to supply oxygen. Check the water level and pH regularly; small changes can affect young plants quickly. It is tempting to start with several crops, but one or two varieties make problems easier to spot. Keep it manageable.
Choose a growing space with stable temperatures, clean water, and enough light. A bright window may work for some herbs, though winter light can be weak and uneven. Measure the area before setting up: a shelf near a wall needs room for the reservoir, plants, and your hands. Leave space to reach plugs and inspect for leaks. A tray beneath the system helps protect floors. Ventilation matters, too, since damp air can encourage mold. Think carefully about noise and humidity in shared rooms. Even a neat setup can feel inconvenient if you must move furniture to refill it. Start modestly, observe how the space behaves, and adjust before adding more plants.
Gathering Equipment, Nutrients, and Planting Materials
A small deep-water culture setup is a practical place to begin. Gather an opaque, food-safe reservoir, a fitted lid, net pots, an air pump, and an air stone. The bubbling keeps oxygen moving around the roots. Keep it simple. Add a grow light if your space lacks a bright, consistent window; a timer can help maintain a steady schedule. A basic pH meter is useful, while an electrical conductivity meter can help track nutrient strength. Neither replaces careful observation.
Choose a complete hydroponic nutrient made for edible plants, and follow its label rather than guessing the dose. Mix nutrients into water before checking pH, since additions can shift the reading. A common target for many leafy greens is mildly acidic water, though crop needs vary. For planting materials, use clean seedlings grown in rockwool or another hydroponic plug. If transferring a seedling from soil, rinse the roots gently; tiny root hairs can be damaged. Avoid filling every pot at once. It is tempting to buy extra supplies, but unused equipment can complicate a first setup. Record water levels and readings, even when they seem uneventful. Your notes may reveal a pattern that memory misses.
Setting Up the System and Starting Seeds
Choose a small, stable hydroponic setup with a reservoir, growing tray, and gentle water pump. Place it near a bright window or under a grow light that can run about 14 to 16 hours daily. Keep the reservoir out of direct sunlight; light encourages algae. Rinse the equipment before use, then fill it with clean water and a nutrient solution mixed according to its label. Check the water’s pH with a test kit. Many leafy greens grow well around pH 5.5 to 6.5, but crop needs can vary. Keep notes. It is easy to forget what changed.
Start seeds in clean, damp plugs made for hydroponics. Place one or two seeds in each plug, following the seed packet’s depth guidance. Keep the plugs moist, not soggy, and warm enough for the crop to germinate. A loose cover can hold humidity, but remove it once seedlings appear. Give young plants gentle light so their stems do not stretch thin. When roots show through the plug and the seedling has a few true leaves, move it into the system. Set the plug securely, with roots able to reach the nutrient solution. Check water level and leaf color every few days. Don’t fuss over every tiny change; beginners often adjust too much, too quickly. I still find that patience is harder than mixing the solution.
Monitoring Plant Growth and Maintaining Water Conditions
Check your plants at the same time each day. Look for new leaves, steady stem growth, and roots that appear firm and pale. Drooping leaves, brown tips, or unusually slow growth can signal stress, but one symptom rarely tells the whole story. Take a quick photo each week and note any changes. Small details matter.
Tips:
Record water level, temperature, pH, and nutrient strength in a simple log. Follow crop-specific guidance for target ranges, and calibrate meters as their instructions recommend. Top up carefully; avoid changing several conditions at once.
Roots need both moisture and oxygen, so check that the system is circulating properly and roots are not sitting in stagnant water. Keep the reservoir covered from light to discourage algae, and clean spills or debris promptly.
Plants do not always respond on schedule. A neat log may still leave questions, but it helps you spot patterns before making adjustments. If growth stalls, compare recent readings and inspect the roots before adding more nutrients.